How to create an Image Gallery in WordPress
So you are back from that trip across Europe and your camera roll is full of mesmerizing images you captured on the trip? Oh! You already own a WordPress blog? Image Galleries are a great way to share large collections of photos. They allow you to display your images professionally without having to do much work other than uploading the pictures themselves. While some people might want to go beyond the call of duty and overwork the issue, there is a simpler way. You do not need fancy and pricey plug-ins to show images in a gallery; WordPress has recently integrated a built-in gallery feature. Not a lot of people know about it, but it is simple, great and free. This article is aimed at developing a theme with which you can display your images in the most enjoyable way.
The method to insert a gallery into your post/page is very easy. All you have to do is to upload the images and set a few preferences. Let us see how it is done.
Step 1: Cursor Placement
In a post or a page, it is very important to have the cursor at the point where you want the gallery to be inserted. If it is between texts then make sure that the cursor is blinking at the exact location you want the gallery to be. It does not matter what size or dimension these images are, when you put them in a gallery, the whole image fits into the thumbnail. When you open it up, it opens into a full screen view.
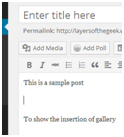
Step 2: Adding Media
In the post creation screen, there is a button right above the word editing labeled “Add media”. Clicking on that button will bring up a dialog box. Once again, there are two ways to upload the media: either you can select from the already uploaded photos, or you can choose to upload the photos yourself. Make sure that you click on ‘create gallery’. Now you can upload and/or select the pictures you want in your gallery. Once you are done with that, one click on the button will send you to a screen where you entire photo collection will be displayed and you will have an option to caption each image. After you have done that, there is a button labeled ‘Insert Gallery’ and you are done.
Being done with that, there are many things you can do afterwards; you can edit the gallery to make changes to the whole album. When you click on the gallery, you will see a button at the upper left corner of the gallery. Clicking on the button, you can edit the complete gallery. Drag and drop the images to change their order. You can even change the way the pictures are displayed when they are opened in full screen.
Displaying the pictures differently
There are various plug-ins you can download to change the way a picture opens in full screen. As it started, the whole plugin business was very different and difficult. You can have the whole armada of effects at your disposal. You can have the images open up like a carousel (similar to the Facebook photo viewer). Similarly, there are countless other effects you can have in your gallery.
There are many reasons you might need a gallery: you might be a photo blogger, or you might be a professional photographer or you might like to demonstrate what you write through pictures. Getting them the proper exposure is the key to success. The whole process is unbelievably simple.
So go ahead and give it a shot. Play around with plug-ins, and stand out of the crowd. This way you can have the same theme as your friends, yet be different. Drawing traffic in by tens of millions of viewers, you will be simply astounded by the stats. Try out these steps and make the most of the technology at your hands. Go the extra mile, unlike others, and use the technology available to you to the fullest.
-
 Posts vs. Pages in WordPress – The Difference
More than once, a WordPress beginner has been known to ask the difference
Posts vs. Pages in WordPress – The Difference
More than once, a WordPress beginner has been known to ask the difference -
Essential Things to do After Installing WordPress
Due to ease of use, WordPress has grown from a simple content management
-
How to Install WordPress Themes
WordPress is preferred over other platforms for various reasons. First of all, it
About Author
OnWPThemes
OnWPThemes is a blog all about WordPress Themes - Find the amazing beautiful Premium WordPress Themes coupled with advanced functionality and get great money off deals with coupons.